I recently purchased the AVerMedia CE310B PCIe capture card for transferring composite sources and I have to say, as far as transferring VHS to digital just using a PCIe card – I’m impressed.
I still enjoy using the non PC digital converters but I’ve been in the process of updating a PC that I can use as a complete sample box.
By that I mean one PC that has the FireWire PCIe card for mini DV transfers and now the AVerMedia CE310B card.
A Closer Inspection
AVerMedia have quite a few PCIe cards that they produce, a lot of them being for surveillance cameras and the like.
There are only two models that directly cater for the composite inputs. The CE310B is the cheapest entry point. But as you’ll read further on, it works just fine.
I got mine from Aliexpress as I couldn’t seem to find it on Amazon. If you are going to purchase this device just know that the delivery does take a good month to arrive.

The card itself can read both NTSC and PAL formats and is compatible with other branded video editors and capture software.

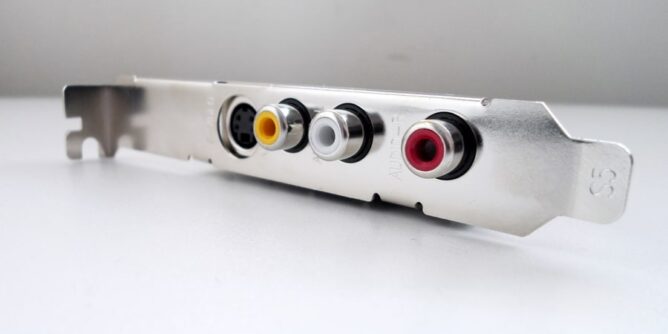
The composite inputs are S-VIDEO for video, YELLOW for video, WHITE and RED for audio.
What’s in the Box?
The packaging is satisfactory, as the card itself is supplied in bubble wrap.

A simple yet sturdy packaged box holds all the items as well as a plastic styrofoam as an extra precaution for the card.

That being said, all that protection and this is all you will see.
A Quick Guide that really just show cases the mini PCIe card collection.
A Thank You Card with the driver download website address.
A spare PC plate for small form factor PCs.
The AVerMedia CE310B capture card.
My card didn’t come with any spare screws. I’m not sure if they are supposed to but one would think they would supply them.
It’s not like everyone has those tiny PC screws laying around!

The silver plate can be detached and changed to the smaller face plate.
Depending how small a computer you wanted to place the card into, I doubt you would need to replace the plate.
Installing the Card
As I stated earlier, I wanted a more dedicated computer that will house my video transfer experiments. Something clean, tidy and easy to dismantle for inserting new cards.
So I went with a refurbished Dell Optiplex 7010.

Mine came with an Intel Core i5 3470, 500GB hard drive, 8GB DDR3 ram and Windows 10. The picture makes it look large but it’s actually quite small.
Considering how cheap this computer is, this is perfect for capturing old standard definition videos.
![DELL OptiPlex 7010 Minitower Desktop PC - Intel Core i5-3470, 3.2GHz, 8GB, 1TB, DVD, Windows 10 Professional (Renewed)']](https://m.media-amazon.com/images/I/51jfQGBXKnL._SL160_.jpg)
- Intel Core i5-3470 - 3.2GHz Processor
- 8GB DDR3 - 1TB SATA Hard Drive.
Last update on 2024-04-24 / Affiliate links / Images from Amazon Product Advertising API
There are quite a few deals and variations on these models, so you may find something even better than what I listed.

There were some things I did/will change though. The power supply that comes with the PC is 275 watts so I decided to swap it with my son’s old leftover parts from his PC.
A 500 watt power supply and his old nvidia GT710. The graphics card is going to be swapped out yet again as it blocks the other PCIe slot I want to use.

The available slot I could use for this card was at the bottom of the motherboard.
Slotting the card into place is extremely easy. My only drama was trying to find a tiny PC screw to keep it place.

You just had to supply one lousy screw AVerMedia! I’m kidding!

A view from the inside shows the card sitting in place firmly.

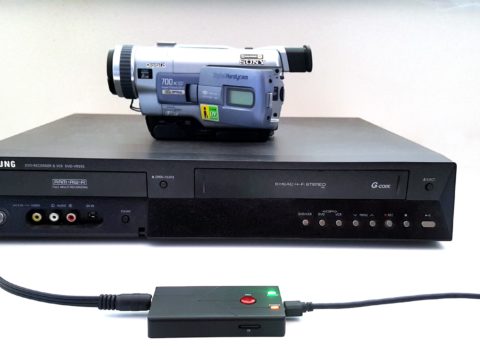
Connection of the composite cable is a breeze.
Composite out from the VCR to the capture card, making sure you match the color scheme. Yellow for video, Red/White for the audio.

This time I’ve decided to add the S-Video cable connection because I seem to always let that go on the way side in the past.

Not all VCRs will have the S-Video output as an option. The model I’m using for this test is from a Samsung DVD/VCR combo drive.
Ironically the time I decide I’m going to use the S-Video cable, I had trouble trying to get the cable to connect.

The S-Video cable fits easily into the card without issues.
That’s it for the physical connections and probably the hardest part.
Installing the Driver & Software
By default, once you have booted up the computer, the PC will not recognize the AVerMedia CE310B card attached.
You will need to download the driver for the card, choosing the appropriate card image toward the bottom of the page.

The driver to download will depend on the OS you are running on your PC. For me, the driver was the second on the page.
Also the Avermedia’s own capture software is available to download from the upper right corner.

Installation of the driver does take a few minutes.

With a few prompts from Windows Security to slow it down.
The same issues from Windows Security applies to the capture software installation. Just let it have permission (if you’re computer asks).
AVerMedia Capture Studio Walkthrough
Finally we have the AVerMedia Capture Studio running and well, first thoughts are less than expected.

Windows Movie Maker called and they want their interface back!
Being a regular user of AVerMedia’s RECentral software I guess I was expecting to be blown away by some modern type of interface.
Then it dawned on me that this device has been around for quite a while and only caters to composite output so there’s probably no reason to have a modern looking interface.
But you know, like Bruce Wayne said, Does it come in black?

Interestingly if you did have multiple capture cards (one can assume only AVerMedia’s), they would be listed along the left side, allowing you to turn on or off at a whim.

Source – allows you to choose between Composite or S-Video.

Resolution – there are a crazy amount of resolution sizes, maybe a bit overkill but at least the software has you covered.
Obviously keeping in mind, the CE310B capture card will only go up to a resolution of 720×576.

The record button sits along the top – kind of hidden among the other functions.
Interestingly the card covers the four main video formats. For the test I simply kept it as a n MP4 format.
By clicking the Settings tab underneath a new window will open.

Whoa, now this I was not expecting! The bitrate can go all the way up to 80,000 kbps? Would you ever use that setting?
I highly doubt it. But that’s impressive none the less.
Smart Fit lets the card decide the kbps, I chose that for the test just to see what happens.

The capture card also has several deinterlacing modes known as Bob and Blend and the option for none.
There’s a page from Videolan’s wiki page that explains various deinterlacing modes with sample pictures.
I kept it on the Smart Fit all the way. I will do more tests in the future and have them posted up soon.

There are options to capture still frames as the video is transferred.

Save Path can be changed to any folder but by default is set to Documents.

Video Quality – clicking this button will open a new window, giving you a summary of the settings previously chosen.
You can create a new setting or select edit settings.

If you do select edit (or new) it will bring you back to the main edit settings as before.
It’s good to know that you can create reusable settings for different cameras.

While capturing, the video will play throughout. Clicking the record button will start the transfer.
Clicking the record button again will simply stop the recording.
OBS Studio was able to add the device and begin to capture straight away.

Magix Movie Edit Pro was able to see the AVermedia CE310B card without any hickups.

- The award-winning video editing program for creating amazing films
- All movie edit Pro features
Last update on 2024-04-24 / Affiliate links / Images from Amazon Product Advertising API
I love using this software probably more than others for it’s simplicity.
Conclusion
Do I recommend the AVerMedia CE310B capture card?
You bet! I think this is awesome!
I have no intentions of taking the card out so it is a permanent fixture on my computer.
I will say that it is a shame that such a good product isn’t really going to be what everyone would use on their computer, especially if you had a small number of cassettes to copy over.
If you have dozens of old family tapes that you want to convert without using a USB capture card and you’re not afraid to open your computer to connect via PCIe slot, then hands down the AVerMedia CE310B is a winner.