Old photos, slides or negatives can be updated into a digital format which can be easily done at home and I’d like to show you how you can scan slides using an Epson scanner as the test sample.
For the following test I’ll just be using slides as the main example.
Before we do start though I want to mention that ScanMyPhotos.com has a special until the end of the year where you only Pay 21¢ Per Slide!
Just to give you a comparison of time verses money, I just completed scanning 1800 slides and it has taken four days, constantly running in the background, for eight hours a day.
But if you do have the time then read on.
How Do You Scan Slides?
In order to scan slides you are going to need a scanner that can read slide film. There are smaller handheld models out there that will just scan slides and negatives but you might as well buy a scanner that can do both photos and negatives/slides.

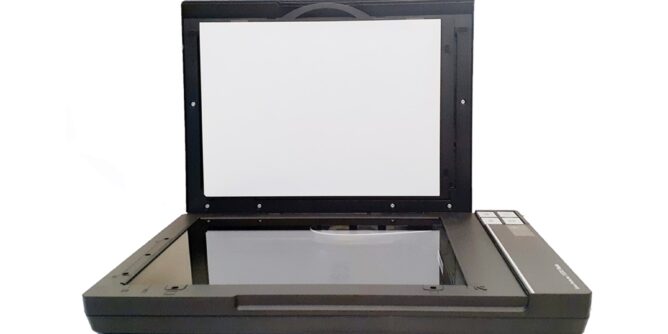
The model above is the Epson V370, which I’m not sure if is available in the US. It’s below the model V600 which is extremely recommended.
No products found.
This model can scan large format negatives and twelve negatives or unmounted slides.
It is also slightly larger than the V370 model I’ll be using for this article.

Another model I use on a daily basis is an outdated Epson V700. This scanner I’ve used since 2009 and still works fine. The advantage it has is having more negative/slide carriers compared to the cheaper models.
This model has since been updated (twice) to the current model which can be found here.
That being said, it might be overkill if you are scanning only a few boxes of slides. In my opinion you can get the same result from the cheaper models.

The white box is called the transparency unit window which is hidden behind the white scanner cover.
You need to have this open if you’re scanning slides or negatives and select the correct settings in the Epson Scan Software.

Next we have the film holder which will hold four slides or one strip of 135mm negatives or positives. You can place 126mm negatives in the film holder as well.

The slide holder only rests the actual slide, it doesn’t tightly hold it.
If you lift up the film holder the slide will drop out.
Scanning 135mm Slides
When scanning slides using an Epson scanner, an interesting visible instruction, is the way that the film holder shows the correct way in which to scan your slide.
But my question to you is, would you know the correct way a slide is viewed if it was a picture of a mountain or some kind of scenery?

The above picture is kind of misleading. If you were not paying close attention you could possibly think writing has to face backwards.
And what writing do you see? The writing on the slide mount! So you place it in backwards.

This is what you need to know.
It’s emulsion side up on a slide. What’s the emulsion?
There is a shiny side and there is a dull side (which is the emulsion side). If you hold a slide against a light you can see a textured surface side verses a shiny surface side.
It can be really hard to see on some slides. Some really old slides (like the example at the end of this article) will cover the slide with glass plates so you can’t tell either way.

The Epson V370 has the slides facing the length of the scanner so that moves along the light box. The Epson V600 scanner the slides can go be placed either way.

Depending on your scan quality, having four slides could take up to 10 minutes or even longer.
Lesser quality will certainly be quicker, which brings me to the next section.
Jpgs or Tiffs For Scanning Slides
The big question – jpgs or tiffs for scanning?
This is where I’m probably going against the norm but I will explain myself.
Yes scanning as tiff file will actually give you a best results.
That being said jpgs are just more user friendly, especially if you have plans with these photos but I’ll get it to that bit more later.

Example I’ve got here is showing the Epson scan software in the professional mode.

This sample after the preview scan and you’ll notice that the slide image is pink.
Along the lower left hand side, there are options to enhance the image. Color Restoration is one of those options that definitely comes in handy.

The Epson scanner will automatically color correct the slide and is pretty accurate.
I’ve noticed that you can get a better result using Photoshop, but if you don’t have Photoshop this certainly is better than just having a magenta cast across your slides.
Scanning Size Examples
So before we get into size examples you need to ask yourself what exactly are you planning to do with the scanned slides? It helps to know in advance what or if the plans for the digital images are.

If it’s for preservation – you can scan every slide into the highest TIFF file that the scanner will allow.
But if you plan on reprinting it into a physical photo for a photo album or into a small frame, do you really need it to be scanned at a massive DPI?
A lot of photo stores generally print at 300 DPI anyway so maybe just having a physical second copy is what you’re after, which case you don’t need 2400 DPI especially if that scan is only going to be a 6×4 print.

Another argument is the higher the DPI the better detail you will preserve.
Again that’s all well and good when it comes to a scenery image or a shot that actually has the detail captured.
But what about Bob and Betty (not their real names) in an every day type of image? Do you really need to preserve that as a 2400 DPI tiff file?
Probably not the best examples, but you can download the samples that will show you what I’m referring to when it comes to scanning.
Sample 001 (jpg 300 dpi) Sample 002 (jpg 600 dpi) Sample 003 (jpg 2400 dpi)
Next samples are scanned as tiff files and do get large. The largest at 143MB.
Sample 004 (tiff 300 dpi) Sample 005 (tiff 600 dpi) Sample 006 (tiff 2400 dpi)
Disadvantages of Tiff Files
If you’re saving the scans as tiff files you need to be aware of other devices that cannot read them.
- Smart TVs (generally don’t read them).
- You can’t simply copy a tiff file to an iPhone. (You could upload to iCloud then download to the phone, but if each image is 100 megabytes – you won’t have the patience).
- Online Photo Labs won’t let you upload a tiff image to print.
- Android phones need an app just to view them.
- You’ll never be able to send it as an attachment (I could be wrong but I’m yet to see someone send ten 143mb files in one attachment to another phone using 4G).
One main issue with extremely large tiff files is the need for storage. You’re going to need a large portable hard drive. And why do I suggest a portable one?
In case of viruses or PC failure. At least it will be stored separately away from issues.
You can upload cloud storage, but they can/will compress your images anyway to save space.
Scanning 126mm Slides
Scanning a 126mm slide is the same as 135mm slide. Emulsion side up.
Placing it in the holder, you could probably use any direction because it’s a square. I think it’s easier to have the image orientation the right way up so you don’t have to flip it around later.

I’m just going to have it I’m just making sure that the writings up the top.

Sample of 126mm slide scanned at 600 DPI using a 4×4 crop.
Scanning 110 Slides
Scanning 110 slides (yes they do exist) can be a bit of a tricky set up because the scanner doesn’t know where the slide actually ends, it doesn’t read it correctly.
The V600 and above have options in the scanning software called Scan with Area Guide and Scan with Holder.
If for some reason the scanner could not detect where the image lies, you could always manually frame the scanning edges around the slide. This can be done under scan with holder option.
The V370 only has scan with area guide as the option.

Showing a difference between a 135 mm slide and a 110 mm slide. The mount diameter is still the same – but obviously the positive image is way smaller.

Holding the slide up to the light, you can see that the quality is not that great. Negatives and positives will fade over time or become washed out.
You’re not going to get fantastic results at 2400 DPI – there’s going to be a limit to the quality you can get.

Examining this slide you could say it’s somewhat underexposed.
You can bring up details using the back light correction in the scanner options along the left hand side, but again don’t be expecting miracles.

Positioning the slides the same way as the previous examples.

Once the preview is complete, you can see this can of still shows a lot of the black frame (which is actually the white frame mount). The scanner cannot zoom in further for the preview.

For this test I changed the DPI to 600 DPI.
The first image on the left I decided to just crop to a 6×4 aspect ratio. This can be done by dragging the the corners inward to crop out the black edge.
The slide on the right I just left as is (but still sized as 6×4) and I will crop it in a editor.

The slide on the left I decided to use Color Restoration to see if it would enhance it.

The result for the image cropped to 6×4 slide. Personally I would still put this image into a photo editor like Photoshop and improve the quality further.

The second sample as you can see did come out still underexposed.
Cropping this could be an issue if I was wanting to keep all of the church in the background.

Using Photoscape, I can crop the image and do a very basic color restoration.
Scanning Unmounted Slides
Scanning unmounted slides is the same as scanning negatives.
It’s not that unusual to see one or two extra images not mounted. They were usually the last off cuts from a roll of film that were either fogged by light.

Placing these into the scanner – only this time we’re using the Negative Film Holder. As stated before emulsion side up.

The scanner preview shows three examples also including the light fogging.
Color Restoration will certainly improve any fading color but it won’t remove light fogging.
Light fogging happened when a person would open the back door of a 35mm camera exposing the film to light. Once the film was developed that’s what the result looked like.

Something I haven’t brought up is that by default Epson uses the pictures folder as the default scanning location. You can change this before you click on the scan button.

The results from the scan example come out fine, like I said earlier the higher the DPI the longer it take to scan to be prepared.
Can You Scan Slides on A Regular Scanner?
What about if you don’t have a scanner that has film holders? Can you scan a slide on any old flatbed scanner?
For the record I don’t recommend doing this to preserve your old slides, this is more an experiment to see what happens if you were to do it.

This is the old 127 format slide. This site explains all the older formats out there in case you need to know.
It will fit in the 135mm scanner slide holder but the V370 scanner will not scan the whole image. The V600 will do it but you need to use the large format holder.

The preview results from the V370 scanner shows the image has been cropped straight down the middle.
Technically if you are willing to lose the edges then maybe this could have worked. If cropping is not an option then it’s onto plan B.

Laying it down on a flatbed scanner, you could rest it against the edges or keep it directly in the middle.

The scanner will see the image as reflective just like copying a photo.

For the test I traced around the actual image and chose 4×4 inches as the print size at 600 DPI.
I wasn’t worried about any straighten accuracy as I would do all that in an editor.
If you had access to Photoshop, you could tidy up the color in that. Even Photopea can do simple color and cropping edits. (Just don’t make it a 2400 DPI tiff file).
Using a Free Photo Tool Called Photoscape
You can download Photoscape for free and it works for both Mac and PC.
This program has been around since the dawn of time (not really, I just remember 2010) it’s robust and I like it. It’s no Photoshop but it can certainly do a lot of quick and easy tools.
And it can open large tiff files and convert them into jpgs if necessary.
A fantastic free photo program that doesn’t require the internet to work. I have it installed on an old Windows 2000 computer and on my Windows 10 Dell PC.
I used the Rotate tool to straighten it out a fraction. This will remove the crooked edges that I scanned when I placed the slide on the glass.
Next I used the Bloom tool so I can lighten it up. Photoscape has a few options in order to lighten or darken images, so this stage was really to keep testing until the image would look better.
I used the Sharpen tool to see if that makes any difference, which did slightly.
Finally flipped the image around to face the right direction.
If you don’t have a slide scanner and you were to try this on a flatbed scanner this is kind of the results that you’d be looking at.
And they’re not pretty.
What’s that phrase desperate times call for desperate measures.
Conclusion
I’m going to say I’m biased toward Epson products. I like their professional scanners, but they can be pricey.
No products found.
Looking at other options there’s Wolverine Titan 8 in 1 and the Magnasonic All in One. Both of these are possible great options for negatives and slides but they don’t do prints, where the Epson brands do.