Making your own canvas print can be an easy process if you pre plan just a few steps ahead. In this article I’ll show the steps on how to make split canvas prints. These steps can be applied to a non split canvas type as well.

I enjoy making canvas prints. There’s something about being able to touch the texture, it’s almost like reliving the moment. You can’t do that with a framed glass picture.
They’re also generally lighter than a framed picture to hang on the wall, so I can use the 3M Command sticky wall hooks.
Apart from being light on the wall the other benefit I like is that I know the image won’t glue itself to a glass frame over time. Have you had that happen?
Before You Start
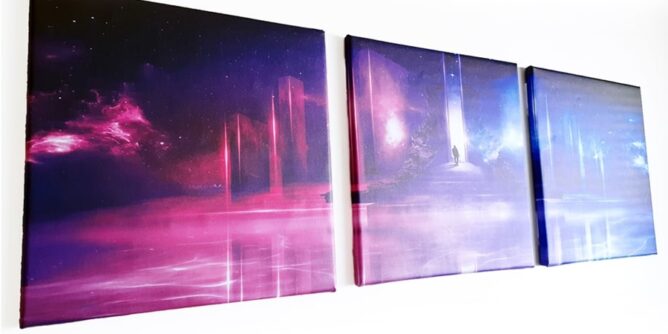
I decided that I wanted to print out a panorama image for a particular wall and searched on DeviantArt. If you haven’t seen the art available there, you’re missing out.
The piece of work I decided to buy was called the cosmic temple. I simply love this person’s work. I plan on purchasing more but probably will not split them up next time.
The canvas frames I bought were 16×16 inches in size.

- 100 % COTTON CANVAS – Made from natural cotton with medium texture, these canvases for painting process higher tinting...
- PINEWOOD STRETCHER BARS – Standard size for easy framing and hanging on the wall. Wood structures with mortise and...
Last update on 2024-10-22 / Affiliate links / Images from Amazon Product Advertising API
These guys have a great range of canvas sizes available for any ideas for printing (or painting) that you have.
You might be thinking, why don’t you buy an empty wooden frame? Turns out it’s just cheaper and easier to use these premade canvas frames. I find wrapping around a premade canvas adds to the tightness for the end result.
Using Photoshop to Resize Your Panorama Image
In order for this panorama to fit onto three 16×16 frames I needed to flatten the image a little. Sometimes you have to take a bit of artistic license.

For the resizing and creating mirrored edges I use Photoshop. You can use Photopea but it takes a few more steps.

In Photoshop hit CTRL+ALT+I to bring up the image size. Personally I work in inches when changing sizes. You may prefer cm or even pixels.
I want to change the document size to 48 inches wide (the 3 separate 16 inch square canvases equal 48 inches combined).

After resizing the image , save the file.
Now I know this sounds weird, but I prefer to use Photoscape for splitting the image.
Why not use Photoshop? I don’t know. I don’t like how many steps I have to go through for something that should be very quick.
There’s a video if you prefer Photoshop to split the image.
There is also an online image splitter called Pinetools. The split images they create is quite large, but I don’t like that you cannot see where the split line will be prior to splitting.
Using Photoscape Splitter Tool
My go to program Photoscape has a great splitter tool that makes this process extremely easy.
It’s available for both Mac and PC and is free.

Simply clicking onto the splitter icon will open a new window.

While it looks basic, you can see the lines where the split will happen. In my opinion this helps to visualize how the end result will look.
There is an option to split by pixel size or simply columns and rows. In the image above columns were changed to 3 and rows was set to 1.
Once the image is set, click on Split to separate the image.

Photoscape will save the new files as the same file name but with added numbers tacked on the end.
How to Create Mirrored Edges in Photoshop
Backwards and forwards, I know. We will be going back to Photoshop to create the edges.

I have my three new square images opened in Photoshop and each individual image will need to have edges created. It doesn’t take that long.

So there is a caveat with Photoscape and its split tool. For some reason the program re-saves the files as larger images.
So in the example above the square image is now 25×25 inches which means I have to resize the image in Photoshop.

Clicking CTRL-ALT-I will allow to change the image size back to 16.1×16.1 inches. I’ll explain the reason for added .1 in a moment.

Next click CRTL-ALT-C to change the canvas size. I prefer to have the Relative box un-ticked. The new canvas size will be changed to 20×20 inches.
Now you could make the canvas size smaller, but I prefer to have a two inch border all the way around the image. If you did have a thick canvas frame having a two inch border will still allow you to wrap the canvas around the frame.

So why 16.1 inches and not 16 inches for the actual image?
The reason is a canvas print will never perfectly bend at a right angle like two pieces of a frame would join together.
They’ll always be some slight curvature even if its a few millimeters. So having that extra .1 on the image, allows the canvas a fraction of leeway around the frame.
I’m telling you now, there’s nothing more frustrating trying to line a canvas print onto a frame only to find a bottom corner isn’t lined up after you proceeded to staple the work.
Another thing I’ll mention is the mirroring. I prefer to mirror the edges as it looks complete without losing the main image. If you don’t do that then the only options are a
- Plain white sides – which looks tacky if you are viewing the image from side on.
- Wrap the canvas without mirroring – which works if there’s space around the main image. Examples of new born babies asleep in those professional photo shoots, that sort of image works, anything with space around the center.
Keeping that in mind if you have a group photo and people are next to the edge of the photo, then they’re going to be wrapped around the side of the frame and that will look weird.
Mirrored edges can have a problem as well. Using the group shot example, mirroring people can look like Siamese twins. So think how an image will possibly look before you decide.

But an image like this is perfect because any slight wrapping errors will not be detected visually. Not from a distance anyway.
Back to Photoshop – in the upper left hand select the Rectangular Marquee Tool .
Draw a rectangle (holding down the left mouse button) along the top of the image. Doesn’t matter how wide, I prefer a few inches.
Let go of the mouse button and then right click on the rectangle.
Look for the Layer Via Copy command and select that.

Click onto the Move Tool (the very first tool on the left side) and you will have a new rectangle layer with small square anchor points.
Simply hold the left mouse button onto the center anchor point and drag the layer up to cover the background canvas.

Copy the same steps for the lower section, dragging the layer to cover the canvas.
These are going to be on the sides of the actual printed canvas so they don’t need to be perfect. Some of it is cut away into waste as you will see later on.
Next go to the top menu and select Layer – Flatten Image.

Repeat the same steps for both sides.

When completed you will have a 16×16 canvas with an outer edge of 2 inches all the way around ready for printing.
Getting The Canvas Printed
Depending on your location, you may have to Google the nearest Photo Lab and ask if they will print rolled canvas. The price is definitely going to be cheaper than having a store print and frame the canvas.
If you wanted to go down the print it yourself path then there’s the option of an Epson SureColor P600.

- Brand Epson, Model C11CE21201
- Packaged Quantity: 1 Pack, Product Type: Inkjet Printer, Recommended Use: Photo/Disc Print, Print Color Capability:...
Last update on 2024-10-22 / Affiliate links / Images from Amazon Product Advertising API
This will let you print onto canvas roll paper but the maximum print width is 13 inches. The length of the print can be whatever you want.
If you are printing and stretching a whole collection of 8×10 canvases into a pattern then this printer will be fine. Depends on how you plan the layout.
Larger prints will require a commercial printer like CanvasChamp.

How I Stretch Wrap a Canvas Print
Now that the printed roll canvas are done, it’s time to see what tools are needed.

First important tool you will need is the staple gun. A durable hand held will be fine.

- Versatile Fastening Tool - YEAHOME 4-in-1 Staple Gun accepts D-shaped, U-shaped, T-shaped, and Pin Staples. This kit...
- Heavy-Duty Staple Gun - Features all chromed-steel construction and a chrome finish to provide strength and durability,...
Last update on 2024-10-22 / Affiliate links / Images from Amazon Product Advertising API
Depending on the brand that you may choose, double check the type of staples it may use. The staples I recommend are 1.2 8mm staples. The 1.2mm stands for how thick each staple is. The 8mm is the length of the staple legs.
Hope that makes sense.
Next you will need a box cutter (aka Stanley Knife), strong scissors that can cut through canvas fabric and a small hammer.
The little black handle blade is actually for opening watch backs.
Of course those are not extremely necessary but they do help make the corners tighter by pushing in excess canvas.
Lining Up The Edges

Lay down the canvas onto the frame and begin to feel where the frame edges are.

Gently proceed to make a guide with the frame edge but also lining up where the mirrored art work meets to align with the frame edge.
This can take a moment or two as you may think everything is lined up only to have one side moved across.

Straightening up the canvas, I’ll check the sides to see if the edges are aligned with the frame edge.

Once happy with the positioning, I’ll lay the canvas face down onto a towel or soft cloth as not to scratch the artwork.
Tighten the top and bottom overlaps.

Then staple in the first staple at the center of the top of the canvas.

I do the same for the bottom overlap keeping the staple in the center. At this point I will do a further check on the sides to make sure all edges are aligned properly.
It’s easier to take out one staple if there is a mistake.
Cutting Corners
For the corners I slice diagonally from the frame corner outwards.

I don’t mark out the line, that was done only for this video showing the angle to cut the canvas.

Using the box cutter to slice the outer edges, you will be doing this to all corners at this point.

Next pull the canvas tighter to continue the stapling on one side, spacing the staples out approximately an inch apart.

Hammer the staples securely into the wood if any are still sticking out slightly.
Folding Corners
Before folding the corners, it helps to cut off any excess canvas that will get in the way.

I will leave approximately a 1-2cm space between the frame and cut off the remainder.

Again it doesn’t need to be exact as the corners will be hidden when completed.

With both edges cut, it’s time to remove the over flap. Sometimes I will do the corners first then cut off the excess, but then the canvas will have extremely thick corners.

Peel back the excess as so you can see where the frame edge lines up to.

I prefer to have these sections cut as close to the frame as possible.

Now with the corner (the 1cm excess left over), bend it along the frame that is perpendicular.
The remaining top canvas requires to be pinched then twist to make the excess canvas perpendicular as well, allowing to lay it flat on the frame and be stapled.
This YouTuber has a different method of doing corners that works if you don’t want to cut the corners.
I’ve been doing this for ten years and I’ve always cut corners.
Says a lot about me.
Continue to do the same steps for the remaining corners.
Remaining Edges and Corners
Once you have stapled the top and bottom frame edges it’s time to do the sides.

I cut the corners off at an angle similar to the lines drawn in the picture above.

You could (for instance) cut the edge at this point as so you don’t have so much canvas over flap but I prefer to do that last.

Fold the remaining corner sections inwards.

Now fold over the frame tightly.
You may need to hold the top of the frame just to make sure the canvas sits firmly against the edge.
At that point you will be able to place a staple into the middle.

The folded in corners can be adjusted so to line up with the frame and give straight angles.

This is where I would use a flat tool (in my case the watch opener) to help push out any canvas buckles or bulges that may occur.

With a bit of patience you will get the edges to look flush against each other.

After completing one corner I would staple across to the opposite corner and straighten out any buckles in the corners.

Hammer in any staples that didn’t completely go through the wood properly.

Finally cut off the last over flap of canvas and you should be complete.
Completed the first canvas frame that is.
Conclusion

While it may appear daunting at first, creating your own split canvas from a work of art can be a fun experience and I highly recommend you give it a try.
There are some fantastic canvas companies out there that have great split photo ideas for your own canvas work. Heck even if you google split canvas ideas you can get some great visual ideas.
It all starts with a plan and an empty wall.