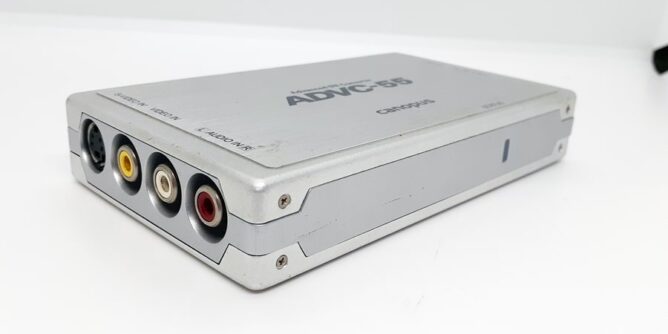
Have you ever wondered if there was a possibility to transfer a VHS tape to a computer using FireWire? In this ADVC 55 review I go through the steps of transferring and decide if it’s worth spending the high amount to buy one.
Trying to find any of the older Canopus Grass Valley products at reasonable prices can be next to impossible. Looking at the search listing on eBay and it varies.

There’s always a high risk with second hand items including these type of devices. The problem that I see is, what are you willing to pay for a used item that can’t be replaced if faulty?
That being said this particular device can handle a few scruffs as long as someone treated it well.
- Connects to all Widely Used DV and Analog Video Equipment.
- Compatible with Windows and Mac OS DV Editing Systems.
Last update on 2024-04-28 / Affiliate links / Images from Amazon Product Advertising API
If you can get access to one, you will need a FireWire card or Mac computer that has a FireWire port. The device itself transfers analogue into digital but that still needs to be connected into a FireWire port.
A Bit of History
There were three capture models that were made by Canopus and became popular (and maybe still used today). Those models are the ADVC 55, ADVC 110 and the ADVC 300.
There are more models but those three were popular amongst videographers transferring tapes.
Obviously the ADVC 55 was the entry level model. The higher end models like ADVC 700 would allow for digital input/output as well as composite input/output.
Doing a search on the Grass Valley website did bring up a document about FireWire 800 and the compatibility of the ADVC products.
ADVC 55 – A Closer Look
The ADVC-55 is made from an aluminum casing which is strong enough to protect the internals.
It will capture NTSC format at 29.97 FPS and PAL at 25FPS.

Along one side of the ADVC 55 we have the S-Video out and composite out. Yellow for video, White/Red for sound. Audio will output 48kHz.

The opposite side of the device you will find DIP Switches (which I’ll cover a little later), a 5 volt power socket and a 6 PIN FireWire port.
Because I already have a FireWire card installed on my PC that will power the ADVC 55 through the 6 PIN port. Also, this device doesn’t need a driver as it’s connected through the FireWire card which already has a driver.
I have an article that explains the difference between FireWire cables which I think you should read if you’re interested in buying a FireWire card.

Along the top of the device are the labels for the various indicators and connections.
I’ve made it easy to get hold of the ADVC 55 manual if you need. The item I purchased didn’t come with one, in fact I’m sure there was a warranty card in there.
Don’t think I’ll contact Grass Valley to validate it in case they acted like this:
That being said, now that I own one I won’t be selling it any time soon.
ADVC 55 – DIP Switches
The DIP switches control certain functions of the ADVC 55, like NTSC/PAL and audio gain.

It is a bit of mixed bag as to understanding the switches (in my opinion). I just played around until a signal came through.
UP is the off position and DOWN is the on position. But if you look at the picture above I only have switch number 2 in the off position.

The rest of the switch numbers 4,5 and 6 are set to reserved, which may mean capture software might be able to utilize different functions.
Even with those switches in the on position, nothing happens. So if you were to purchase this device, you should really just be concerned with whether the footage is NTSC or PAL.
ADVC 55 – Connection
Connection is extremely easy with the composite cables from the AV OUT connecting to the AV IN on the ADVC 55.

I didn’t try the S-Video connection I simply stuck to the composite cables for this test.

So this scenario is ideal if you were copying from a VCR through to FireWire. Other cameras like a Video8 or Hi8 can work through the same composite connection.
Digital 8 or Mini DV will plug directly into a FireWire card without the need for the ADVC 55.

Once plugged into the FireWire card the ADVC 55 will light up indicating it is powered.

I would recommend a 6PIN to 6PIN FireWire cable so that you have power and data transfer. Any other method (6PIN to 4PIN) you will have the data transfer but no power.
ADVC 55 – Recording Software
Even though the VHS format is analogue, any recording software will be reading the ADVC 55’s data, so it will think it’s a digital format.

Choosing the DV connection allows the footage to be imported.

My go to program for DV recording is Magix Video Editor Pro. Any video editor that allows to import from DV source will work fine.
If you’re on a Mac, you are going to need an older model that at least has a FireWire port, then you can import into iMovie.
Results
Because the final result will be in a very large avi file, you will need to make sure you have enough hard drive space.

The test cassette I used was only 38minutes long and the file was 8.27GB. That’s big.
Using those numbers, a rough estimation of a 3 hour VHS cassette could equal 48GB! I would definitely recommend converting the AVI file into MP4 to save on space.
Conclusion
I like the ADVC 55 but would I say this is something worth searching out and buying?
Probably not.
While I do think the quality is great, I have a feeling the AVerMedia CE310B PCIe capture card gave a cleaner look from a composite connection.
Will have to do a thorough test to be sure.
The device I bought off eBay still has the original purchase receipt, which is dated 2008.
That was 12 years ago and it works perfectly fine today with a Windows 10 computer. No driver required, powered by a FireWire card for minimal cable fuss – the ADVC-55 is still a workhorse after all this time.

If you have no intention of upgrading your PC then this device will just be overkill. It can be pricey to find and you will need to buy a FireWire card to be able to capture any footage.
If you can get past those requirements then yes this device is awesome.


