I’m always praising how great OBS Studio is.
I thought maybe it’s time to actually show how to actually install OBS Studio and what settings to use if you are going to use this great piece of software. Keep in mind these are the settings that I have used when recording from a VCR.
I won’t be explaining how to set up streaming, just letting you know right now.
This post is for anyone who wants to use the software as a recording method for their home videos.
What is OBS Studio?
Simply explained, OBS Studio is a free program that will allow you to record from various inputs ie: your computer monitor, a capture device, etc (those are the main two I’ve bothered to dabble with).
The OBS stands for Open Broadcast Software and is available for Windows. Mac and Linux, so it shows the dedication and popularity of this program.
And did I mention free?
Whether you will end up using all the features that the software can offer is certainly up to you. But I’ll tell you now, this program comes in handy for recording even from simple USB capture devices.
So just to reiterate, OBS Studio is a recording/streaming software but you will still need to have a capture device of some sort in order to have the two work together.
Installing OBS Studio
Typing OBS Studio into Google will give you the correct result or you could follow this link directly there.

You’re going to greeted with their home screen allowing you to download for your operating system.
Once you click the desired button, the application will commence to download.

Run the application to start the install process.


Follow the steps to get past the license agreement and installation folder.
I wanted to show those steps to let you see there is no freeware/spyware ad dons. It’s just a simple install.

Actually I will point out, I have seen times when OBS Studio will ask to install Microsoft NET framework, but that was on older PCs running Windows 7.

Once installed the program will ask if you want to auto configure the software based on your computer settings. I would generally advise yes unless you confident enough to skip.

The auto configuration will ask if you want to optimize for streaming or recording.
Select optimize for recording.

Base Canvas Resolution is what OBS suggests you could use for recording. In the case of copying old VHS tapes , you wouldn’t need to go larger than 720p.
The example above shows that the computer is able to produce a base canvas size of 1080 at either 60FPS or 30FPS.

When you are happy with the results click on Apply Settings.

And this is what the program will look like. There are numerous resources that can be found that can alter the way the software works, but for home usage, the way it runs out of the box is just fine.
Adding the Capture Card Name
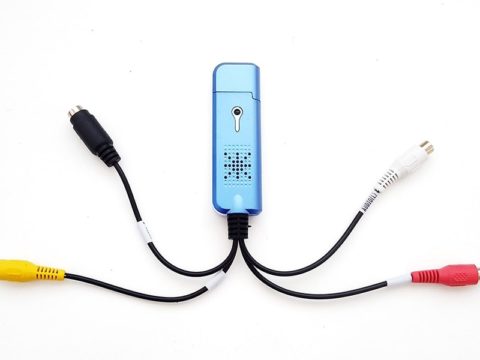
As I stated earlier, OBS Studio is just a recording software so you will need a capture device for it to recognize.
For this example I’ve used the ezcap284 on a new computer.
Something that you need to do is install the driver for the capture card you are recording from.

Once you have your capture device attached to your computer, simply click the plus symbol to add the new device.
The option we are looking for is Video Capture Device.

A new window will pop open where you can rename the source.
I put this step in there as a just in case OBS Studio won’t show the video (for some reason) and you keep adding new sources until it works.
Unfortunately I’ve seen this happen with the USB capture sticks. But not always.

When you have finished renaming the source, the properties settings will open allowing to change the capture card signal.
The ezcap 284 driver is listed in the picture above.
There are options that you will (possibly) need to alter but we can get back to those settings later.
Changing The Settings
Personally I prefer to change the export settings before altering the capture settings.
With that said, in the lower right hand side of the OBS Studio home screen, you will see the settings option button.

Opening that window will give a variety of settings that can be changed.
I personally only change the Output and Video.
The other settings won’t be needed if you’re just transferring old videos.

Under the Output Mode tab there are two ways to change the settings, Simple or Advanced.
We’re doing a simple recording, so let’s stick with the Simple option.
No shame being simple!
Video Bitrate – You can alter the recording bitrate. I usually change it 12000kbps. The file will be large.
The default is 2500kbps. In this example I didn’t change the settings, I just left it as default.
Encoder – This can dependent on your computer specs. To make it simple, if your computer will allow it, use the x264 encoder. The quality will be better but it may make your computer CPU work a bit harder.
Audio Bitrate – This will allow to change the sound quality. Increasing the sound to 320kbps is recommended.
Recording Path – Allows you to choose the destination path of the recorded video file.
Recording Quality – You can change to set presets. I choose the option same as stream (which was chosen as 12000kbps).
Recording Format – There are a few file formats you can choose from (but not limited to) mov, mp4, TS file, mkv. Choose MP4 for the easily online shared file type.
The remaining settings are not going to affect the transfer quality from a VCR.

Onto the Video settings:
Base Canvas Resolution – Think of this as the maximum output size of your monitor or graphics card, I say keep it at the 1920×1080 setting.
Output Scaled Resolution – Choose the 1280×720 setting because we are only dealing with standard definition video quality, don’t stress over this.
Downscale Filter – I usually choose the bicupic sharpened scale, which may be over kill.

Common FPS Values – This setting will need to be changed to the correct video input. So for example if the video was 60FPS then this setting should be changed to 60FPS.
The same applies to a 30FPS VHS tape that’s originally recorded from a TV source.
PAL users will need to change to 50FPS from home video cameras, or 25FPS from old TV sources.
After the changes made click on Apply, then OK to close the window.

And that brings us back to the device settings.
On the home screen, you will see the device name you added along the bottom window.
You can either double left click (or right click and choose properties), both methods will produce the same result, which is to configure how OBS Studio is capturing the video source.
Configure and Recording
If your video source (whether a VCR or video camera) is connected to your capture device (in my example it’s the ezcap 284) and it’s playing you may see no image at all.
That’s fine. OBS Studio doesn’t know which input source it should be using.

Click on Configure Crossbar and a new window will pop open.

Under the Input drop down panel, there are a choice of various video inputs from Composite, Component, HDMI and S-Video.
Leave the Output as is.

In this example, the signal is from a composite source so when I selected that. Simply click on Apply then OK.
At this point, you may have to close OBS Studio and reopen the program. This seems to be the method for the software to save the configured changes you made.
That being said, I have come across times where the video would appear after a slight delay without the need of restarting OBS Studio.

Once again going into the crossbar configuration, we can see the video appears.

Audio Output Mode – this should be left as the capture audio, which is the audio from the capture card device itself.

There is a small cog wheel that when clicked upon will open a window allowing to you edit the volume decibels.
I’ve never found the need to change that, but it’s excellent that the feature is there.

Something to point out is the red frame on the black canvas background.
This can be stretched out to cover the canvas or (as I would suggest) kept just in the centre of the canvas leaving black borders along either side.
I would also suggest you size the video on the canvas before you proceed to record as anything you do (like moving the video square around) will appear in the final result.
When you are ready click on the Start Recording button and OBS Studio will capture the video signal.
And you will be able to record for as long as you like (or hard drive space will allow).
The same button will be used to Stop Recording.
Conclusion
OBS Studio is used and loved by professional streamers, works on all computer set ups and is better designed than some software that is supplied with USB capture devices.
Considering this is free, it’s worth a look if you are needing to capture old videos and don’t have the software to do it.