In this article I’ll share some cropping tips when scanning photos that you can use for printing later on. Digitizing photos from your photo collection (whether a photo album or shoe box) may seem like an arduous task but it will definitely be worth it in the end.
I personally think there’s extreme value in scanning old photos. Once done, there’s a feeling of memories being safe, that now you can back them up.
I do prefer flat bed scanners as opposed to phone scanners like Google’s Photoscan. I haven’t played around with that app, but I will do a comparison soon enough.

While the examples on show will be from an Epson scanner, the same can be applied to any brand scanner or combination scanner/printer.
If you are interested in knowing what scanning formats and size you should use, I have an article here that explains the various scan sizes ad dpi resolutions in depth.
Cropping a Photo For Future Printing
So what do I mean cropping a photo for future printing? Well it simply refers to scanning a photo in order to fit a popular frame or album size. Most common photo albums are set for the 6×4 inch size (not including wedding albums).
Think of it like this, if you were scanning photos from an old family album to share with other family members, do you know what they want to do with those photos?
If they don’t own a computer, then they simply might want physical copies. Yes, there are people who still want physical copies of photos.
Then again I also get asked does anyone print photos theses days?

There’s always passports.

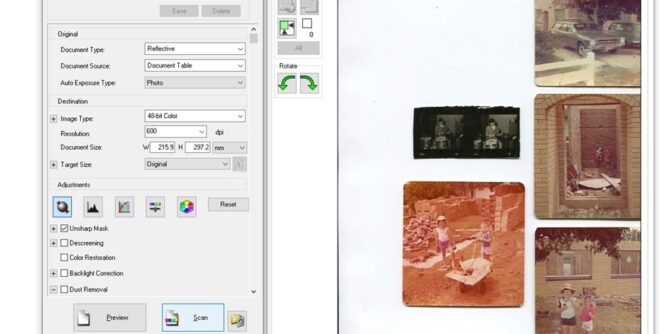
Using the example above, we can see there are five various sized images.
DO NOT simply click preview, then think what you see is fine and proceed to scan all the photos as one page.
That’s a big no no in my book.
At some point later – someone (maybe yourself) – has to crop the photos separately in an editor. So why not just take the time at the start to set up any crop and size you will need.
Canon USA mention how to scan multiple documents (in a somewhat easy manner) in their knowledge base using auto detect, which can make life easier while scanning.
Although they do have a warning that some photos will not work, photos smaller than 3cm or photos cut in weird shapes are some examples of those warnings.

What I do suggest is to go through each photo and decide how you want to crop those images.
If it’s important to you, you’ll do it.
Selecting a preset size (6×4 for this example) then tracing the frame around the photo, you will be able to get a true 6×4 sized photo for each scan.
Cropping Example One
So let’s just say, you want to keep the whole image to match the way it appears originally.

Keeping with the 6×4 inch size ratio and creating a frame around the whole photo, we can see the scanner will include the back plate thus creating a white border along the top and bottom.

If you were to print the image out at a photo lab it will include those white borders.

You can simply cut those borders off and then you would have a physical copy matching the original sized photo. But if you’re not fussed about losing a fraction off the photo then scanning to a different size could work as well.

Again depending on the type of photos you are scanning, you could go with a 4×4 inch square size.
No products found.
Amazon has some interesting types of albums that cater this kind of size. Generally ideal if you were printing out Instagram images.
No products found.
Otherwise standard 6×4 photo albums are the most popular especially as a photo album makes a great gift for life.

If we crop as 6×4 (directly onto the image) and focus on the children then you won’t have to worry about unnecessary borders.

Using the Epson auto color correction gives an example the way the photo should look. Although I will add I would dabble further with a color editing software to really get better results.
Cropping Example Two
The next example goes through different cropping layouts which can possibly tell a different visual story.

An old image like this has possibly two memories that someone may want to preserve.
First is the two children, who as adults would like to see what they looked like when they were young. (Don’t we all?)
Second is the house being built in the background. By the looks of the image, one could assume it’s that children’s family house being built, so there’s going to be plenty of memories associated with this image alone.

A 4×4 inch crop can keep both the children and the house.
But similar to the first image example, if someone prints this as a 6×4 inch photo, they will have borders.

A 6×4 inch horizontal crop emphasizes the children only and ignores the house they are standing in front of. This type of crop doesn’t really tell us anything about the background.
Maybe they were a children’s version of Bonnie and Clyde and the boy is pointing the gun at the photographer. If the house meant nothing, then sure, cropping closer to the children is fine.

The 6×4 inch vertical crop keeps both the children and the house partially in the image.
Do we need to see the whole house? There are bricks in the background, you can see through the window therefore we can assume the house is being built.

If I was cropping a photo to scan as 6×4, I’d more than likely go with a vertical 6×4. This is all relative to a photo and if there is wasted background space that can be cropped out.
Conclusion
When it comes to scanning your old photos take the time to decide:
- Are you going to print these images out in the future?
- If you’re giving copies away to friends or family, are they going to print the photos?
- Is it easier to crop the scans as one size each (example 6×4)?
While scanning does take time, especially if you have hundreds of images to digitize, it is something that can easily be done at home. The beauty is you don’t have to scan everything at once.
Just take your time.
Funny thing is, once completed, you’ll probably have family members asking you to scan their albums.


