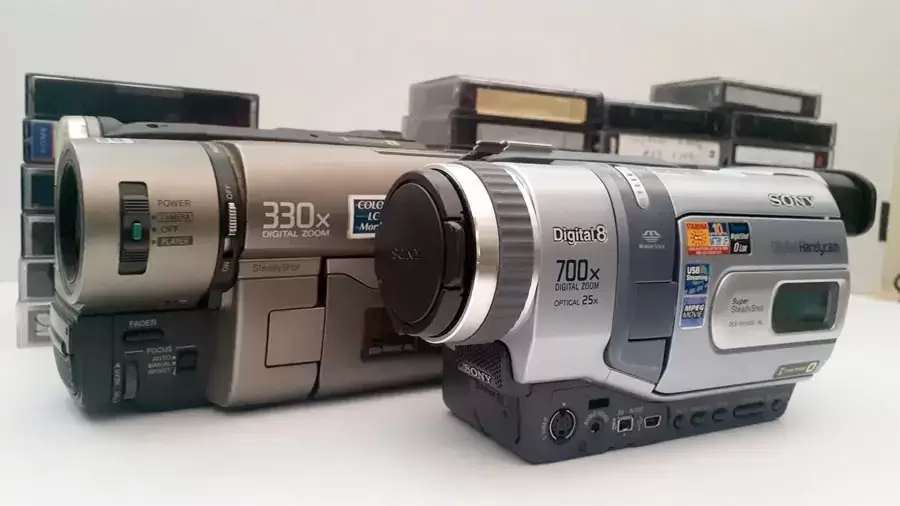
Digital8 cameras have the luxury of being hybrid beasts that could play back Video8, Hi8 and digital format. They allow you to link via FireWire and transfer any of those three formats to your computer.
If you already own one of these cameras and you are deciding whether to digitize the tapes (you should that’s just my opinion). You have two options to choose from.
One: You can follow this method I wrote about transferring Video 8 tapes using the AV connection into a capture device.
Two: For better results if you own a PC, you could install a FireWire card and connect the camera via the supplied cable.
I have a post that explains how to transfer Mini DV tapes to digital that shows the process of the FireWire card and driver install.
When it comes to transferring Video8, Hi8 or Digital8, I prefer to simplify the process with just one camera.

While I do own a Hi8 camcorder, I find myself using the Digital8 to transfer the tapes for reliability.
By having a Digital8 camera connected to the PC via a FireWire card, I can transfer Hi8 or standard Video8 the same way.
Keep in mind, Sony has a list of Digital8 camcorders that cannot play back the older analogue tapes so if you are looking to buy a Digital8 camcorder for all three 8mm formats, make sure they are not on that list.

Wikipedia has a great article that explains the difference between Mini DV and Digital8.
8mm Tapes To Digital
When using the Hi8 cassette for a Digital8 camcorder, you will get 60 minutes of record time. The reason for this is due to the tape having to run at twice the normal speed (for NTSC regions) to record more data.
PAL regions ran at one and half times the normal recording speed.

Something that has often occurred when I’ve had to transfer a customer’s 8mm tape collection, is that I will ask them Do you know if they are Video8 or Hi8 or Digital8?
And they will stare at me blankly. Usually at that point I’ll say never mind I’ll work it out.
So what happens if you place a tape recorded on a Digital8 Camcorder into a Hi8 camcorder?

Generally you get a blue screen and a lot of hissing sound for the audio. Which brings me back to the point of why it’s easier to just own one camera that can play back all 8mm formats for transfers.

Along the front end of the camcorder is where you would see the options for transferring your tapes.
S-Video and Audio/Video connections work as an analogue signal so you will be able to transfer video footage with a USB capture device if you prefer that method.
Quality can be a over saturated as seen in this example. That being said saturation can easily be fixed with a decent video editor.
The DV IN/OUT is what you will be using to connect with the FireWire cable.
The mini USB that is shown is for copying photos that were taken using the Sony memory sticks.
Transferring Digital8 Using FireWire Connection
If you prefer not having to tinker inside your PC trying to insert cards, you could go the option of buying an older Macbook Pro that has the FireWire connection built in.
The advantage of that particular model Macbook Pro is that it still has a DVD drive allowing you to burn the Digital8 cassettes to DVD.

If you are going the route of a PCIe card, you will need to make sure the drivers are up to date with your operating system.
Another card by Shinestar ,which has an Amazon’s Choice rating, comes highly recommended as it supports Windows 10 all the way back to Windows 98!
That’s not the model I have installed on my workstation, but they are all very similar.

Make sure the camcorder is set to VCR mode for playback of the tape.
The cable supplied plugs into the card of the PC and into the DV IN/OUT connector port on the camcorder.

Check the connection is securely placed and you will hear a connection ding sound telling Windows a device is connected.
Capturing From Digital 8
So at this point you are going to need software to import the tapes. Now you have a few options free or paid.
Looking for a free version? Believe it or not, I recommend downloading the classic Windows Movie Maker 2016.
It’s from a website called Top Win Movie maker that has three different editors that can be download.
I haven’t tried the other two, but I definitely know the classic movie maker works to import digital tapes.
There’s an old video on YouTube that shows how to import from digital camcorders. Don’t let the age of it fool you into thinking it’s outdated information.

For paid software I’ve been using Magix for my Digital 8 and Mini DV transfers. I have a lengthy review of the software which you can read here.
Other easy to use editors with DVD authoring are Corel VideoStudio and PowerDirector.
Even getting an older version can help you achieve importing from a Digital8 camera. The drivers haven’t changed over the years.

Imported files will be saved as an AVI format. Those then be edited using the same software or burnt to a DVD disc.

If you plan on keeping the files as they are (uncompressed), be prepared to have a large hard drive. A one hour tape will take up a whopping 13GB of disk space.
Something to think about, copying these files for family, will they be able to play the files on their computers?
That’s where exporting the files to format like an MP4 is what I’d recommend.
Conclusion

If you already own one of these camcorders and still haven’t transferred your tapes, I’d get to work on it now. These cameras are getting hard to find at reasonable prices.
And repairs are almost non existent.
Personally I don’t get a lot of Digital8 tapes to convert. Having the camera itself has become a great tool for transferring though.